
How KillBot Works - Everything You Need to Know
This article provides a complete overview of KillBot. I'll explain its main advantages, integration options, traffic filtering technology, system reliability, and the tools you'll get after connecting your website. You'll also see what information is available inside the dashboard.
KillBot is a full reverse proxy protection service that sits in front of your website. Every visitor request first passes through the KillBot servers, where it is analyzed and filtered before being forwarded to your website. This allows bots to be stopped before they ever reach your server.
KillBot can also work as a simple JavaScript integration. However, this is NOT website protection. It only provides bot analytics. JavaScript alone cannot block bots. If you want bots to be physically prevented from accessing your website, you need to use KillBot DNS Protection.
Today, KillBot is the only publicly available service that can detect all modern behavioral bots. The dashboard clearly explains why each visit was classified as a bot. For every website, you can instantly see the number of bots, real visitors, CAPTCHA challenges shown, and successfully solved CAPTCHAs. Even the overall statistics demonstrate how accurately KillBot filters traffic:
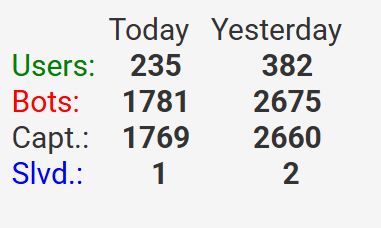
The screenshot above shows the overall KillBot statistics. Out of more than 5,000 CAPTCHA challenges, only 22 were solved. This means CAPTCHAs are almost always shown to bots rather than real users. The quality of the remaining traffic can easily be verified through conversions and visitor behavior in your analytics platform.
KillBot Doesn't Hide Its Detection Logic
Most anti-fraud platforms do not provide detailed CAPTCHA statistics or explain who was actually blocked - a real visitor or a bot. Their usual response is simply: "Every anti-fraud solution blocks some legitimate users. That's normal."
KillBot is completely transparent. If you notice too many CAPTCHA solutions, it's a clear signal that your settings should be adjusted. Before blocking any visitor fingerprint, you'll always know whether it contains only bots or may also include legitimate users.
Good protection should be transparent, predictable, and constantly improving—not dependent on keeping its detection methods secret.
Detailed Information About Every Visit
After connecting your website, KillBot provides detailed technical information for every visitor.
For each visit, the system collects and generates dozens of parameters that are used to determine whether the visitor is a real person or an automated bot.
Here's an example:
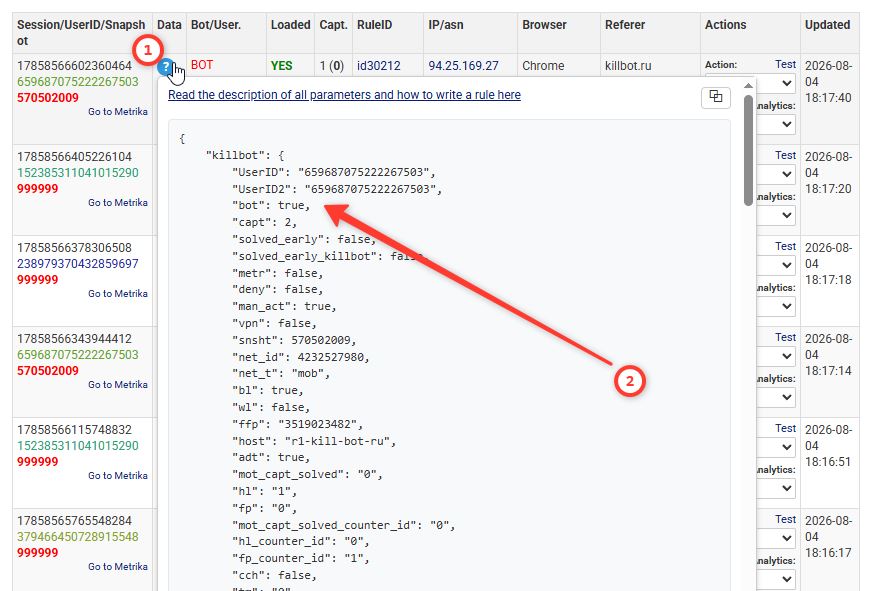
The screenshot above shows only a small portion of the technical parameters collected by KillBot.
You can also create your own detection rules using PHP and any available parameters. The example below marks every visitor from China as a bot:
if ($data['net']['country'] == 'CN') { return true; // Show CAPTCHA to visitors from China } return false;
You can find the complete list of available KillBot parameters and examples of custom rules here: https://my.kill-bot.net/node/44.
KillBot Creates a UserID That Doesn't Depend on Cookies
One of the most useful features in the Visits page is UserID. Each visitor receives a stable pseudo-unique identifier. In most cases, even if the visitor clears cookies or opens your website in Incognito mode, the same UserID will still be assigned.
This UserID is more than accurate enough to identify visitors within a single website.
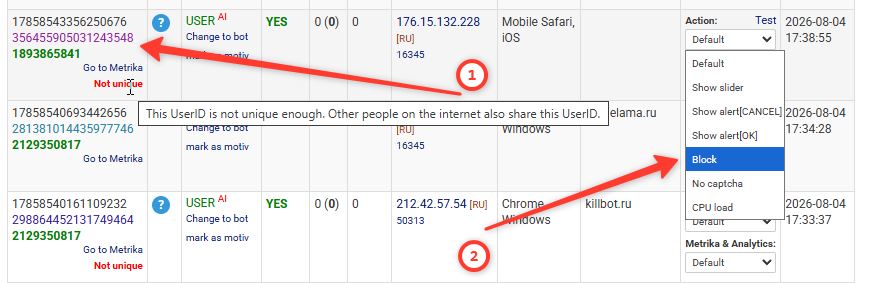
KillBot UserID is especially useful for blocking persistent human spammers. Showing them a CAPTCHA is pointless—they'll simply solve it. Blocking their UserID is much more effective.
If KillBot determines that a particular UserID is not unique enough, it will clearly warn you so you know that blocking it may affect multiple visitors.
See Exactly Why Every Visit Was Blocked or Allowed
For example, in the dashboard you only need to move your mouse over the "Bot" label to see a detailed explanation of why this specific visit was classified as a bot:

In the same way, you can move your mouse over the CAPTCHA icon, and KillBot will show exactly why the CAPTCHA challenge was displayed:

Instead of a "black box" approach, KillBot always lets you understand why a certain decision was made.
Clean Analytics After Installing KillBot
Another advantage of KillBot becomes visible immediately after installation.
Before protection is enabled, Yandex Metrica and Google Analytics often contain a large amount of suspicious traffic: high bounce rates, direct visits, unusual search engine traffic, and suspicious advertising clicks.
After connecting KillBot, bot traffic simply stops appearing in your analytics. You only need to enable the appropriate setting or use an AI subscription plan, and KillBot will handle this automatically.
A Single Website Can Use Multiple KillBot Servers
If one IP address becomes temporarily unavailable for any reason (government blocking, local firewall restrictions, server failure, or another issue), the browser will automatically use another available KillBot server and the visitor will still be able to access the website. Your website continues working without interruption. The screenshot below shows an example of connecting a website to two KillBot servers:
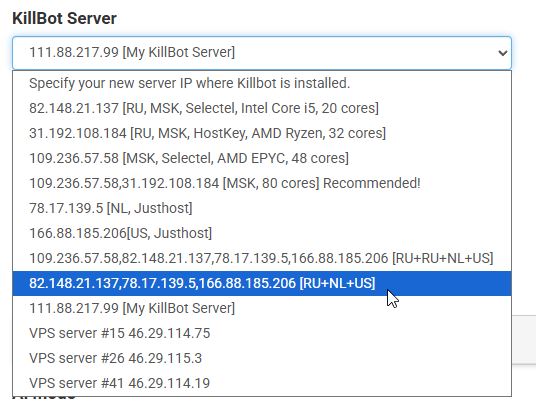
Read how to connect your website to multiple KillBot servers here: https://my.kill-bot.net/node/74
Deploy KillBot on Your Own Server
If you want full control over your own infrastructure, you can deploy KillBot on your own server.
Self-hosted installation allows you to:
- Customize the KillBot Verification Page design;
- Create your own CAPTCHA design and change the link to KillBot's general user agreement;
- Increase traffic limits (shared servers already provide high limits, but some large projects may need more);
- Run KillBot inside your own infrastructure (for example, behind your own load balancer);
- Add your own custom code if you need functionality that is not available by default.
Read how to install KillBot on your own server here: https://my.kill-bot.net/node/31
See How a Bot Passes CAPTCHA With Your Own Eyes
One of the most interesting KillBot features is the ability to watch how bots interact with CAPTCHA pages through Yandex Webvisor. Everything is recorded:
-
The CAPTCHA page itself;
-
How the bot moves the mouse cursor or taps on the CAPTCHA area;
-
How the bot clicks hidden links (yes, the CAPTCHA page contains hidden links).
This is direct proof that an automated bot accessed your website. For marketers and analysts, this is one of the most valuable traffic analysis tools.
Make Bots Spend More CPU Resources
KillBot can do more than just block bots. It can also make automated traffic much more expensive for attackers to operate.
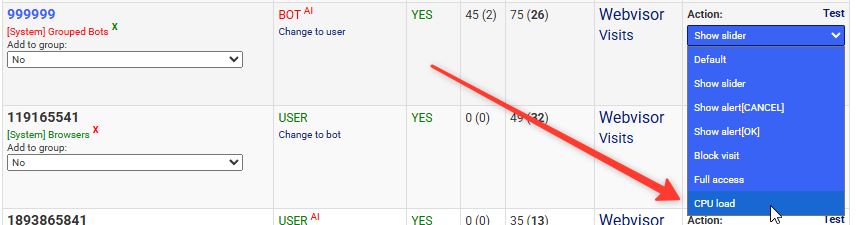
KillBot includes a special option called "CPU Load". When enabled, the bot receives a resource-intensive JavaScript code. This causes high CPU and memory usage on the device where the bot browser is running.
As a result, one bot starts consuming significant computing resources, reducing the number of bots that can run simultaneously on the attacker's server.
This approach can sometimes be more effective than simple blocking because the bot operator may decide to remove your website from their automation list to avoid wasting server resources.
Below is an example of increasing CPU usage for a bot:
Why KillBot's DNS Integration is Better Than JS Integration: When to Use and How to Configure
KillBot offers two integration methods: JavaScript (JS) and DNS. Both methods have their advantages but are designed for different tasks. Let's examine the difference, when DNS integration should be used, and why it's more effective in protecting against bots and attacks.
When to Use KillBot DNS Integration
DNS integration is necessary if you want to completely block bot access to your site — even before they can load any content. This is especially important if you:
- Protect contact data: For example, to prevent phone numbers from being stolen from your site. A common scheme now: competitors parse phone numbers, then get call details through mobile operators and call back these contacts. This is direct lead theft — potential clients you could have converted into sales.
-
Block price scraping: Prices are regularly scanned by competitors for price wars. DNS integration prevents bots from even starting to load the page.
-
Guard unique content: Articles, catalogs, product descriptions — all of this can be stolen and placed on competitor sites. DNS integration allows you to protect content originality and uniqueness.
-
Prevent HTTP DDoS attacks: This is one of the most common ways to crash a site. KillBot DNS integration acts as an external verification page, filtering malicious traffic before it reaches the server.
When JS Integration is Sufficient
If your main task is analytics, ad traffic filtering, and flexible bot interaction, then JS integration is suitable.
KillBot JS integration allows you to:
- Determine if a visit is from a bot;
-
Display CAPTCHA to suspicious visits;
-
Collect analytics: who saw CAPTCHA, who passed it;
-
Create audiences for retargeting;
-
Filter non-target traffic in Yandex.Direct and other advertising systems.
However, it's important to understand: JS integration doesn't block access to content. Scripts load after the page is delivered to the browser, meaning bots can access data before being identified.
This limitation is related to the technology's nature: JavaScript executes in the client's browser, after HTML loads. Therefore, JS integration is better suited for analytics, data collection, and working with bots post-factum.
How to Configure KillBot DNS Integration
Configuring KillBot DNS integration doesn't require complex technical knowledge, but it's important to follow instructions precisely for KillBot's verification page to effectively protect your site.
Step 1. Choosing Integration Type
In the KillBot dashboard:
- Set Up KillBot: https://my.kill-bot.net/script/get-code.
-
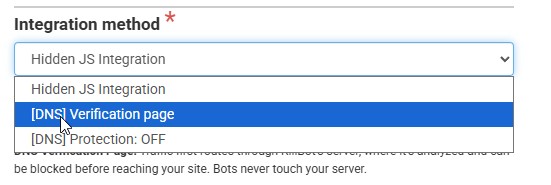
In the integration method section, select [DNS] Verification Page:
- Click the "Next" button.
After this, a page with DNS integration settings will open.
Step 2. Specifying Your Site's Server IP Address
The first and most important field — your server's IP address, i.e., the address your site should lead to after passing KillBot verification:
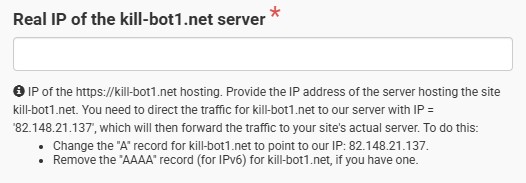
If you don't know the IP address — no problem. KillBot will determine and show the presumed IP. This value will be correct if your site isn't behind an external protective service like CloudFlare, StormWall, etc. In such cases, KillBot might determine the IP of an intermediate filter, not your server.
Verify that the specified IP actually belongs to your hosting.
Step 3. Selecting KillBot Server
Next, you need to choose which KillBot server will proxy traffic. This is necessary for geographical optimization and performance:
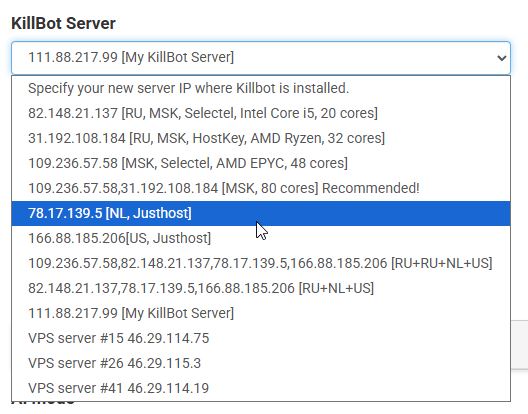
- If your site targets Russia — choose the Russian server in
Selectel. -
If the audience is from Europe or other regions — choose our Netherlands proxy server.
-
If you want to deploy KillBot on your own server, read: how to deploy KillBot on your own server
IMPORTANT: at this stage, your domain's DNS A-records (both with www and without www) must point to KillBot server's IP address — the one you selected from the list.
Also:
-
Mandatory: remove all AAAA records (for domain with
wwwand withoutwww) — these are IPv6 records that KillBot currently doesn't support. - Ensure only one A-record exists. If additional A-records remain in DNS, site hanging errors may occur.
- There should be only one A-record pointing to KillBot server.
How DNS Integration Works
After completing setup:
- All requests to your site will first go to KillBot's proxy server.
-
There, each visit undergoes verification.
-
Bots can be blocked, looped, or receive CAPTCHA (this is configurable, by default CAPTCHA is only shown to bots).
-
Legitimate visitors are instantly redirected to your server without delays.
Configuration for Sites Behind Proxy Protection (CloudFlare, StormWall, etc.)
In this case use "a self-signed certificate":
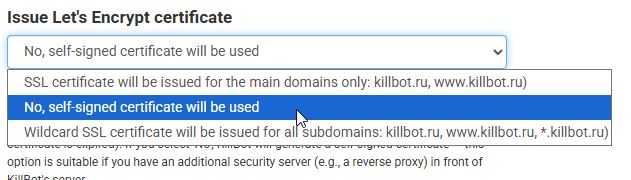
If your site is already protected by an external service (e.g., CloudFlare), it's hidden behind another proxy server, making standard Let's Encrypt SSL certificate issuance impossible.
In this case, KillBot:
- Disables Let's Encrypt certificate issuance.
-
Issues a self-signed certificate that doesn't require domain verification.
-
Doesn't verify that your DNS already points to KillBot — everything activates immediately.
If KillBot is first in the chain (i.e., it's at the front and directly interacts with visitors), then a full SSL certificate from Let's Encrypt or another trusted authority is necessary.
If KillBot is behind another proxy (e.g., behind CloudFlare), browsers don't see it directly — and a self-signed certificate is sufficient. This is standard practice in infrastructure with multiple proxy levels.
CloudFlare Configuration Specifics
For everything to work correctly:
-
Go to CloudFlare (or other proxy) settings:
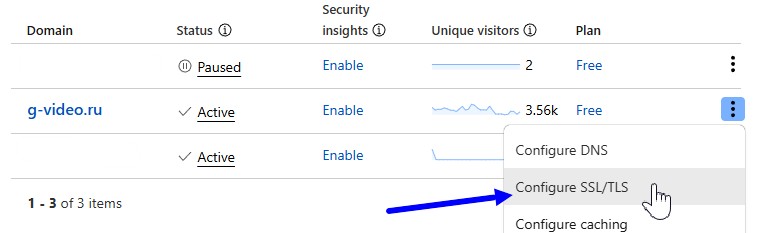
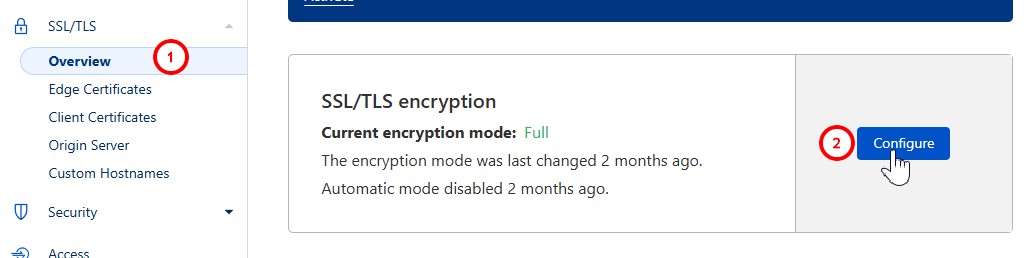
-
In the SSL section, select "Full" mode.
- This tells CloudFlare not to verify whether KillBot's certificate is trusted:
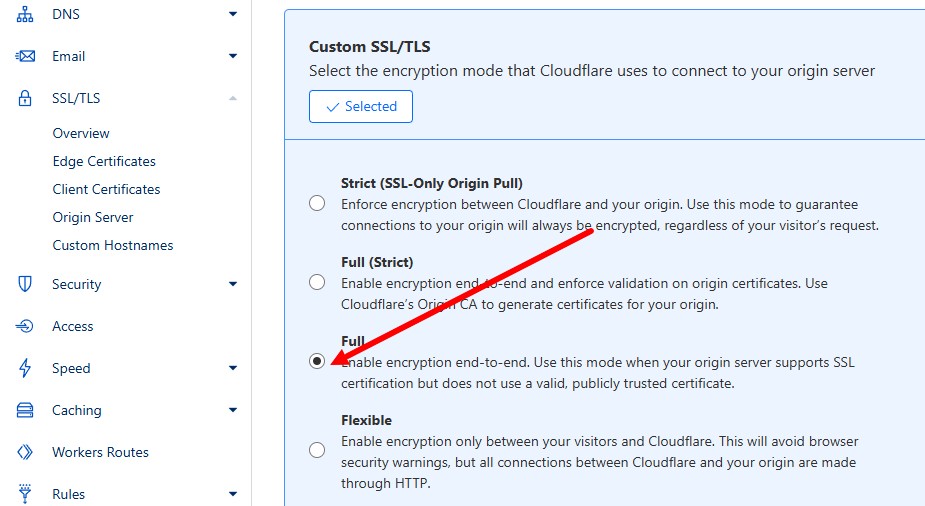
-
Otherwise (if "Strict" mode is selected), CloudFlare might block the connection due to the self-signed certificate.
💡 Such a scheme is standard practice when integrating with CDN, protective proxies, and other intermediaries. Self-signed certificates are used between services that don't require public certificate trust.
How to Allow Access to Your Own Bots, Crawlers, and Analyzers in KillBot
By default, KillBot blocks all simple HTTP bots (except search engines and other trusted bots from the whitelist). The following types of bots will be blocked:
- checkers and validators,
- SEO analysis tools,
- bots that scan robots.txt and XML files,
- technical export bots (for example, 1C integration bots),
- any other third-party bots that are not search engines and are not included in the KillBot whitelist.
Without additional settings, KillBot allows access to:
- search engine bots (Baidu, Google, Yandex etc.),
- messenger bots,
- other known and useful bots from the whitelist (Telegram, Facebook, etc.).
All other bots are blocked by default.
You need to allow access if you need:
- export products from your website,
- SEO analysis tools to check your website (title, description, page structure),
- generate XML feeds for ads or marketplaces,
- allow website images, CSS, JavaScript and other resources to be accessed from outside the website,
- and similar tasks.
- these bots need to be allowed manually.
How to allow bots in KillBot
0. Temporarily disable KillBot Verification page during scanning
This is the easiest option if you do not want to find and add bot IP addresses or User-Agent values manually.
Go to the "Integration Method" settings and select "DNS Protection: OFF".
Remember to enable it again after the scanning process is finished.
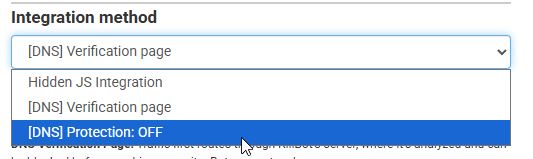
Then click "Save". Do NOT click "Reload DNS".
1. Allow access by IP address
If a bot or analyzer has a fixed IP address, the safest method is to add this IP address to the allowed list.
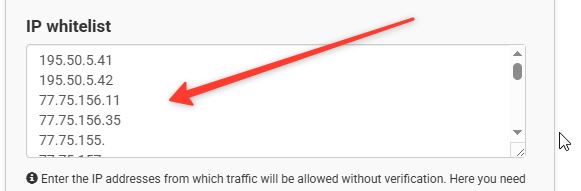
This method is suitable for:
- SEO services,
- business integrations,
- internal data export systems.
IMPORTANT! Add your website server IP address to the allowed list. This allows KillBot to pass all internal requests from your own server.
2. Allow access by URL path
You can allow access to a specific URL path for any IP address.
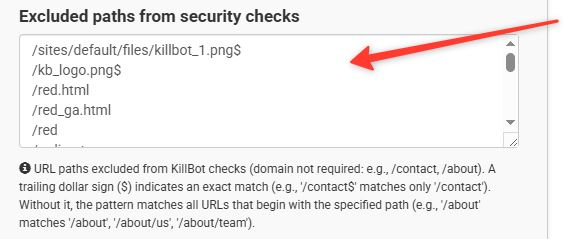
Examples:
- product XML feed path,
- 1C export path,
- any other URL paths that can be accessed from different IP addresses.
3. Allow access by User-Agent
You can allow all visitors with a specific User-Agent.
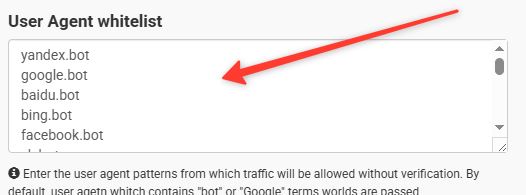
Please note: your website will also be accessible to any other bot that uses the same User-Agent.
Add User-Agent values like this: KillBot allows requests when the User-Agent contains all specified words (separated by dots).
Example: Yandex.bot allows any User-Agent that contains both words: "Yandex" and "bot".
Important: do not remove the default values (yandex, google), otherwise search engines will not be able to index your website.
Allow access to website images and other resources
By default, KillBot blocks opening images outside the website.
To allow image export, add the image path of your website to the allowed list.
What to do if I do not know the bot IP address or User-Agent?
In this case, check the verification page header returned by KillBot.
KillBot adds the bot IP address and User-Agent to the page header. This makes it easy to find the required information and add the bot to the allowed list.
Example: I want to allow access for the checker https://page-speed.ru/tools/metatags/
If I enter my website address into this tool, the checker will receive the KillBot verification page. The page header will contain the IP address that made the request to KillBot. This IP address can be added to the allowed list.

If the analysis tool does not show the page header, many tools provide the received HTML code instead. In this case, you can find the User-Agent or IP address inside the HTML code.
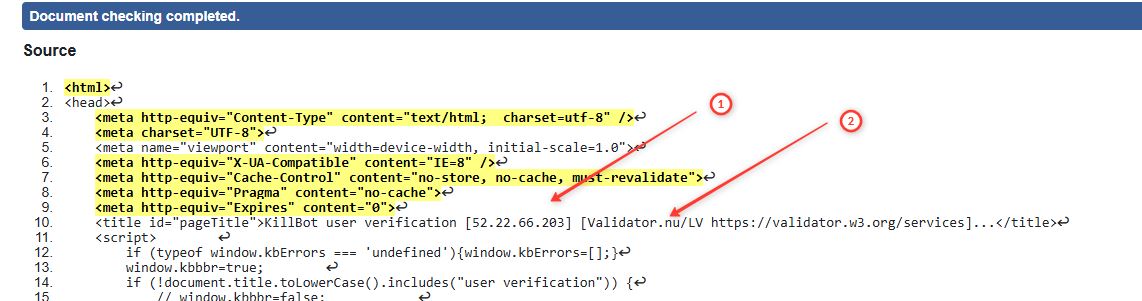
To allow the analyzer shown in the screenshot above:
- - either add IP address "52.22.66.203" to the allowed list,
- - or add "Validator.nu" to the allowed User-Agent field.
How KillBot Handles Bots: CAPTCHA, CPU Load and Blocking
By default, KillBot does not block traffic (it may only show CAPTCHA): all visitors are analyzed and allowed to access the website without restrictions. However, you can manually configure how the system should respond to traffic that is detected as bot traffic.
Flexible bot response settings
For each browser "snapshot" (a unique software identifier used to determine whether a visitor is a bot or a real user), you can set an individual action:
-
Show slider CAPTCHA - a good option when you want to check who is behind a snapshot: bots or real users. In this case, you should review visitor sessions in Webvisor manually and make sure that bots cannot solve the CAPTCHA.
Example of slider CAPTCHA: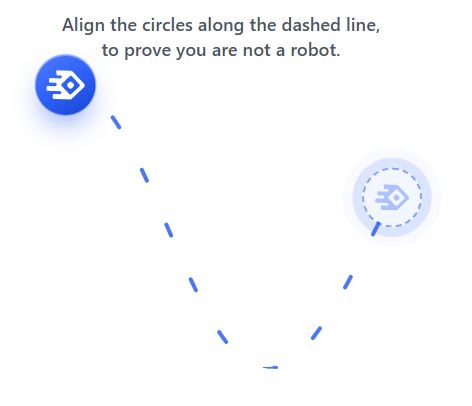
-
Block - completely deny website access for a specific snapshot. This is a good option when you are 100% sure that the snapshotbelongs to bots.
-
CPU load - create an endless loading loop to consume bot CPU resources. This can be useful when you want the bot software administrator to remove your website from their scraping or automation list.
-
Analytics and Metrics - the goal of many bots is to appear in analytics systems (for visit history, traffic simulation, and bypassing anti-fraud systems). If the bot does not appear in analytics, it may stop visiting your website. IMPORTANT: when blocking a visit or creating a loop, analytics tracking works first and blocking happens afterwards. Therefore, if you do not want blocked visits to appear in analytics, you also need to enable the "Hide analytics" option.
-
Full access - take no action and allow access.
You can combine these methods for one website. For example, if you have five snapshots and two of them are detected as bots, you can show CAPTCHA for one snapshot, create a loop for another one, while allowing real users to access the website normally.
Working with search engine bots
For DNS Verification page, search engine bots are automatically allowed and do not see the KillBot page. They access the website without any restrictions - they do not interact with KillBot at all.
For JS integration, search engine bots may appear as separate snapshots. By default, CAPTCHA will not be shown to them (even if the "Show CAPTCHA to everyone" option is enabled). However, if you manually configure CAPTCHA or blocking for a search engine bot snapshot, this action will be applied.
with DNS Verification page integration, search engine bots are not detected by KillBot because they bypass the verification page completely. With JS integration, search engine bots that execute JavaScript may appear as snapshots - be careful not to block them.
Custom bot handling using JavaScript
In some cases, you may need to execute your own JavaScript code depending on whether the visitor is a real user or a bot.
If you use JS integration, you can add your own JavaScript code directly into a special KillBot script function:
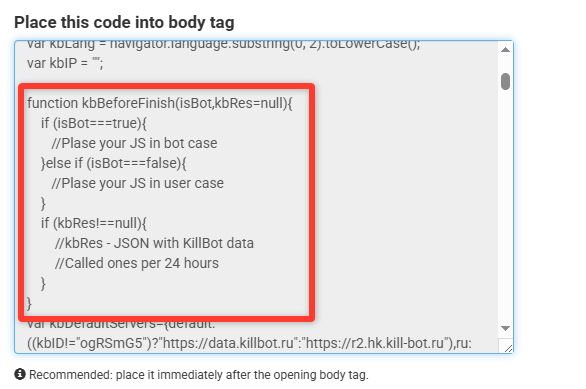
Below is an example of a function that sends a Metrica goal for real users and creates an endless redirect for bots:
async function kbBeforeFinish(isBot) {
    if (isBot==false){
        // add your code if it is a real user
    }
    if (isBot==true){
        // add your code if it is a bot
    }
}
If you use DNS integration, you can also add your own JavaScript code to the KillBot Verification page, BUT only if you use your own KillBot server. On your own server, you can add custom JS code in the verification page PHP file:
/opt/killbot/html/verification.php
Individual bot blocking by snapshot
KillBot allows you to process different snapshots differently. IMPORTANT: make sure you do not block real users (and search engine bots if you use JS integration).
Click the "Snapshots" section on your websites page https://my.kill-bot.net/script/list. This is the main KillBot section for traffic analysis:

The snapshot type and its owner are shown in the left column:
- If the label is green, it means the snapshot belongs to a system group of real browsers.
- If the label is red, it means the snapshot most likely contains bots or may be used by bots.
Available actions for each snapshot are shown in the right column under "Actions":
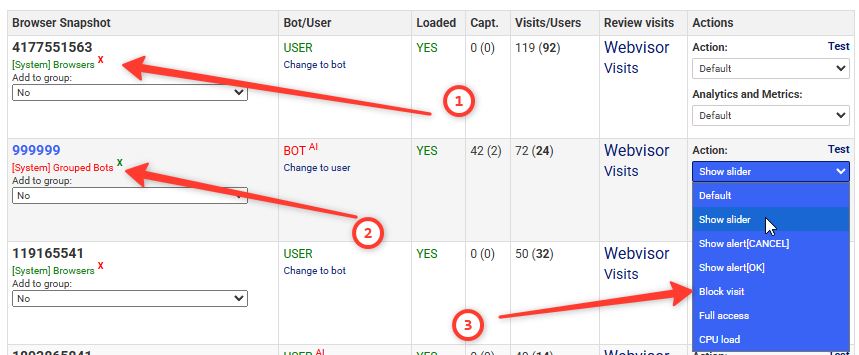
If you want to block or CPU load for a snapshot, always make sure:
-
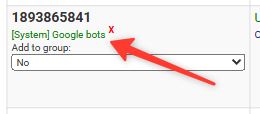
The snapshot does not belong to a search engine bot. Carefully read the label under the snapshot . For example, Google bot is marked as shown in the screenshot below:
-
Make sure there are no real users behind this snapshot.
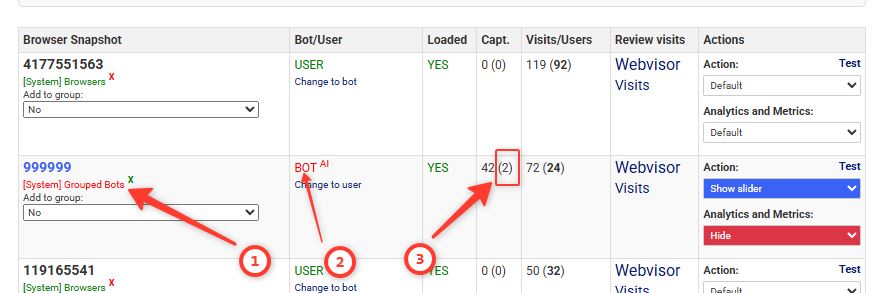
Check how many times CAPTCHA was solved — this is the "CAPT." column. If CAPT=42 (2) it means theat captcha was hhown 42 times and was solved only 2 times.
By default, CAPTCHA is shown only to bots. Therefore, if the column shows zero captcha solves ( for example CAPT.=105(0)), make sure that the script settings actually show CAPTCHA for this snapshot. To check how the website reacts to a visit with a specific snapshot, click the "Test" link:

-
Below is an example of a bot snapshot, but for 42 captcha shows, captcha was solved 2 times. This means that real users may exist behind this snapshot, so I would not block it:
Attention! Real, motivated users can also solve the captcha using anti-detect browsers. In this case, such visits will also be assigned to bot snapshots. Please keep this in mind when making decisions about blocking.
-
Make sure the number of visits for the snapshot is large enough: preferably more than 10 visits.
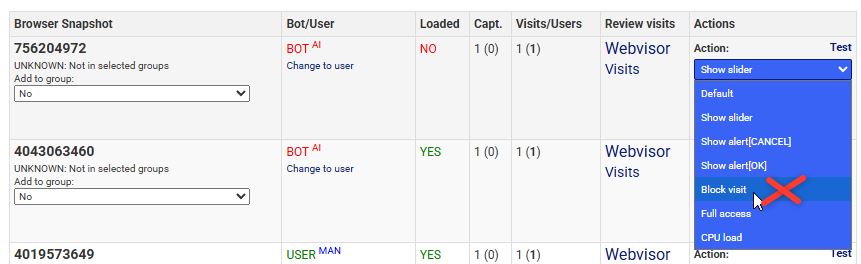
If a snapshot has only 3 visits, this is usually not enough information to decide whether it belongs to users or bots.
IMPORTANT: snapshot visits are NOT visits from one specific person. They are visits from the same software.
For example: I use Chrome, and another person in China also uses Chrome. We use the same browser software, so our visits may have the same snapshot.
Therefore, I do not recommend blocking snapshots with a very small number of visits (1 visit on scrinshot):
-
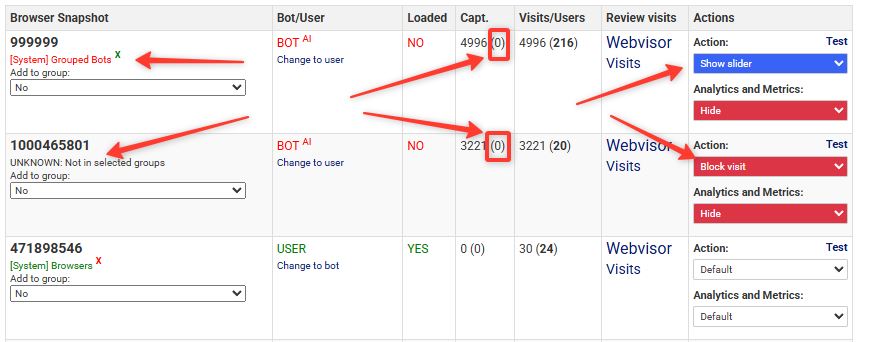
Below is an example of snapshots that can be blocked or CPU load:
There are many visits, no CAPTCHA solutions, the snapshot is not in known real browser groups, or it belongs to a bot group:
-
Below is an example of what you should NOT do:
All "green" system snapshots were added to bots and blocked.
Do not do this, otherwise real users (including yourself) will not be able to access the website:
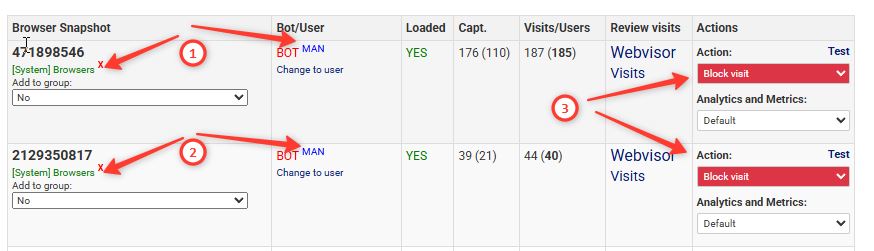
Individual "green" snapshots may sometimes contain bots, but they should not be blocked as a whole group.
How to Create Traffic Filtering Rules [WAF] Based on Visit Data
Traffic filtering in KillBot is possible not only through browser snapshots, but also through flexible filtering rules that can be created manually. This gives you full control over filtering logic and allows you to configure protection according to your real needs. Rules can use browser parameters, KillBot parameters, user IP information, and other data to perform the required action (block, show captcha, create a loop, hide analytics).
Attention!
Rules are executed specifically on the KillBot verification page. This means that the user first reaches the verification page (the rotating blue circle), and only then the rule is executed (on the JavaScript level). If you need the verification page not to appear at all (for example, for payment system callbacks), use the script settings: IP whitelist, user-agent whitelist, and the list of pages where protection is completely disabled.
Where Can I Find Parameters for Creating Rules?
All important parameters can be viewed in the KillBot interface. To do this, open the "Visits" section and move the mouse over the "?" icon located in the data column:

The data in KillBot is presented in JSON format. The data is grouped into "blocks" with parameters and their values:
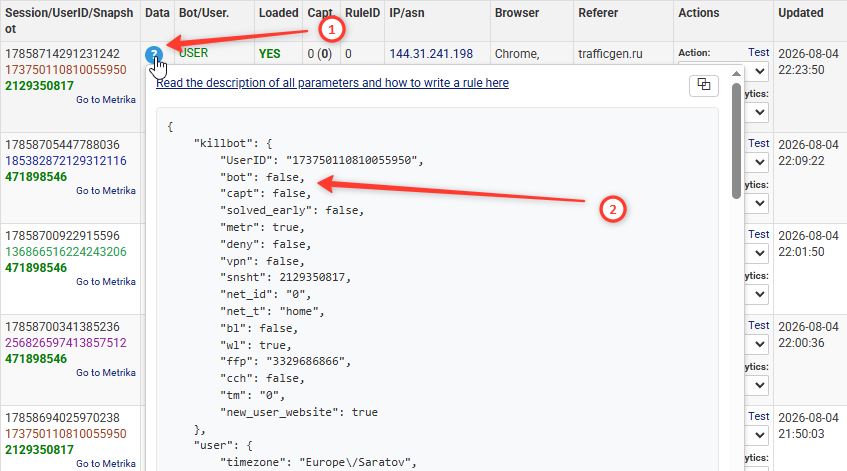
Example of Data Used for Creating a Rule:
{ "killbot": { "UserID": "387619204031415763", /*UserID - pseudo-unique user identifier. If user_pop=true, the user is not unique enough*/ "bot": true, /*bot=true if the browser snapshot snsht is not found in system browsers (green browsers, wl=false)*/ "capt": false, /*whether captcha was shown*/ "solved_early": true, /*whether captcha was solved before for this UserID*/ "metr": false, /*if false, analytics code is hidden. If true, analytics code is added to the website*/ "deny": false, /*whether blocking is enabled in the action column on the snapshots page*/ "man_act": true, /*means that an action is set manually for this snsht snapshot (not default action). Action can be set manually or by AI*/ "vpn": false, /*vpn=true if Instagram website can be reached from the user's network*/ "snsht": 2129350817, /*browser snapshot identifier*/ "net_id": 1978768490, /*numeric identifier of user network*/ "net_t": "home", "bl": true, /*browser snapshot belongs to a bot group (groups are marked red on snapshots page)*/ "wl": false, /*browser snapshot belongs to trusted browser group (groups are marked green)*/ "ffp": "3329686866", /*font fingerprint - how the browser renders fonts*/ "cch": false, /*whether page content was changed on the client side*/ "tm": "3", /*time in seconds required to load KillBotVerification page. Many visits with time above 3 seconds can indicate bots*/ "rule_id": "30212", /*rule number that matched the visit*/ "rule_capt": 2, /*captcha action from rule. Rule captcha has higher priority than capt*/ "rule_metr": false, /*whether to hide analytics according to rule. Rule value has higher priority than metr*/ "rule_deny": false, /*blocking according to rule. Has higher priority than deny*/ "rule_bot": true, /*classify visit as bot or not according to rule. Has higher priority than bot*/ "user_capt": false, /*captcha action set for UserID on visits page. Has the highest priority (overwrites rule result)*/ "user_metr": true, /*show/hide analytics for UserID. Has the highest priority*/ "user_deny": true, /*blocking set for UserID on visits page. Has the highest priority*/ "user_bot": true, /*classify UserID as bot or user. Has the highest priority*/ "user_pop": true, /*means UserID is not unique enough because many users have the same ID*/ "new_user_website": true, /*new user for this website*/ "capt_force_all": true /*captcha is enabled for everyone regardless of other captcha settings*/ }, "user": { "timezone": "UTC", "locale": "ru" }, "net": { "ip": "18.216.102.68", "host": "ec2-18-216-102-68.us-east-2.compute.amazonaws.com", /*hostname resolved from IP*/ "asn": "25454", "country": "US", "ports": { /*list of open ports on this IP*/ "22": { "port": 22, "ttl": 58, "rtt": 48 }, "443": { "port": 443, "ttl": 58, "rtt": 56 } }, "ping": true, /*whether IP responds to ping*/ "ttlOS": "Linux", /*operating system detected by TTL (Linux, Windows, etc.)*/ "ttl": "57", /*TTL value*/ "ttl_b": "57", /*reverse TTL value*/ "rtt": 0 /*time until first response packet*/ }, "request": { "user-agent": "Mozilla\/5.0 (Windows NT 10.0; Win64; x64) AppleWebKit\/537.36 (KHTML, like Gecko) Chrome\/150.0.0.0 Safari\/537.36", "referer": "", "accept-language": "ru-RU,ru;q=0.9,en-US;q=0.8,en;q=0.7", "url": "https:\/\/my.kill-bot.net" }, "browser": { "name": "Chrome", "language": "ru-RU", "webdriver": true, /*webdriver=true means the browser is controlled by software*/ "innerheight": 919, "innerwidth": 1920, "outerheight": 1040, "outerwidth": 1920 }, "device": { "width": 1920, "height": 1080, "os": "Windows", "gc": "ANGLE (NVIDIA, NVIDIA GeForce GT 710 (0x0000128B) Direct3D11 vs_5_0 ps_5_0, D3D11)", /*GPU information*/ "fps": 61 /*browser screen rendering frequency, bots can reduce it*/ } }
Example: Why the Parameters Above Belong to a Bot
- The parameter
"webdriver": truemeans that the browser is controlled by software. - The timezone is
"timezone": "UTC", but the user IP location is the USA ("country": "US"). - The visitor IP address
"ip": "18.216.102.68"resolves to an Amazon server:"host": "ec2-18-216-102-68.us-east-2.compute.amazonaws.com". - An anti-detect browser technology is used:
"adt": true. - KillBot script was not fully loaded: l.false — this behavior is typical for bots.
- The website browser snapshot is not in the list of known browsers: wl.false.
Priority Order!
The default classification of visits as users or bots has the lowest priority. By default, a visit is classified as a bot if its browser snapshot is not found in system browsers. If an action is set in the snapshot action column (the action can be assigned manually or by AI), this action overrides the default behavior. If a rule exists and the visit matches this rule, the rule overrides the action configured for the browser snapshot on the snapshots page. If an individual action is set for the UserID on the visits page, this user-specific action overrides all previous actions.
Attention!
Creating rules requires programming knowledge. If you need help creating a rule, contact us in Telegram: https://t.me/grigoriy_melnikov We can create a rule specifically for your case. A simple visual rule builder will be added later, where anyone will be able to create rules by clicking buttons without programming.
Instruction: How to Write PHP Traffic Filtering Rules in KillBot
You can create traffic filtering rules on this page: https://my.kill-bot.net/waf/create (left menu → create rule)
There are two main fields:
-
PHP rule code — write your filtering logic using PHP.
-
Visit JSON parameters — test data used to check your rule. You can simply copy and paste visit data here to test your rule.
Available PHP Language Elements
Available Variable
-
$data— contains the JSON structure of the visit (for example,$data['user']['locale']). Use only$data. All other variables are forbidden.
Allowed Functions
strpos, stripos, strstr, stristr, str_contains, substr, preg_match, in_array, isset, empty, count, strlen, array_key_exists
Allowed Operators
&&, ||, !, ==, ===, !=, !==, <, >, <=, >=
Allowed Language Constructs
if, else, elseif, return, true, false, null
Forbidden
-
Dangerous functions:
eval,exec,system,shell_exec,fopen,file_get_contents,include,require, etc. -
Creating classes/functions: You cannot use
function,class,namespace,new. -
Global variables:
$_GET,$_POST,$_SERVERand others. -
Output:
echo,print,die,exitare forbidden.
Example: How to Access Parameters
| What you need | How to write |
|---|---|
| Timezone | $data['user']['timezone'] |
| User language | $data['user']['locale'] |
| User-Agent | $data['request']['user-agent'] |
| WebDriver (bot indicator) | $data['browser']['webdriver'] |
| IP hostname | $data['net']['host'] |
| TTL OS | $data['net']['ttlOS'] |
| Operating system | $data['device']['os'] |
What Should the PHP Rule Return?
The PHP code must return true or false. TRUE means that the rule condition is matched and the rule is triggered.
Attention!
You can create many filtering rules in KillBot. Rules are checked in order. The first rule that returns TRUE is applied, and all following rules are ignored. If no rule matches, the visit is classified as a bot or a user according to the default KillBot script settings.
Rule Creation Example
Below is a rule that marks all visits as bots if the user-agent contains the word Bot:
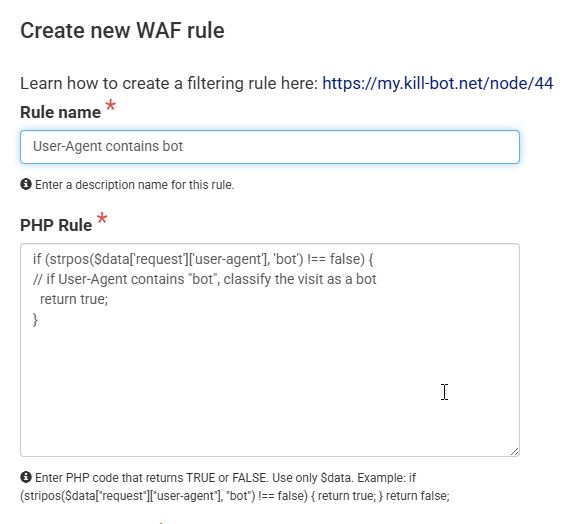
if (stripos($data['request']['user-agent'], 'bot') !== false) {
  return true;
}
return false;
Explanation:
$data['request']['user-agent']— User-Agent string of the visitor.stripos— function that searches for the substring "Bot". Because it uses "i" (case-insensitive), "bot" and "Bot" are treated the same.stripos($data['request']['user-agent'], 'bot')— searches for the first occurrence of "bot" and returns FALSE if this text is not found.if (stripos($data['request']['user-agent'], 'bot') !== false)— means the condition is TRUE if the User-Agent contains the word "bot".
This is how the rule looks in the KillBot interface:
Click the "Save rule" button. At this moment KillBot checks the rule syntax and shows the result of applying the rule to the test data:
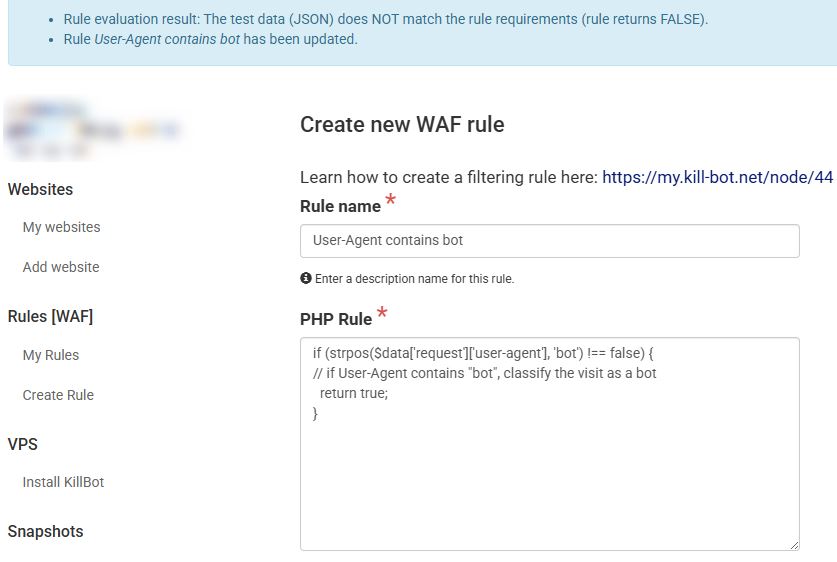
KillBot shows the message: "Rule execution result: FALSE - rule was not triggered, test data does not match the rule conditions" This means that the User-Agent shown in the screenshot does not contain the word Bot.
Now change the test User-Agent to the Google bot User-Agent: Mozilla/5.0 (compatible; Googlebot/2.1; +https://www.google.com/bot.html) Then click "Save rule" again and check the result.
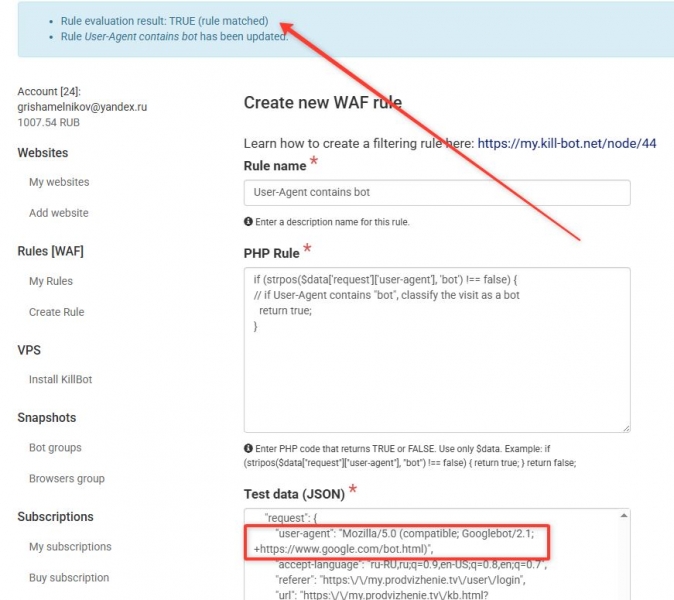
Our rule returned TRUE because the User-Agent contains the substring "Bot".
Improve the Rule: Allow Real Search Engine Bots and Block Fake Ones
This rule improvement is only an example. In KillBot DNS integration, this logic is already built in and works automatically. You do not need to create this rule separately.
One of the main ways to verify whether a visit really belongs to Googlebot is to check which hostname the visitor IP address resolves to. KillBot automatically detects the hostname associated with the visitor IP address. This value is stored in: $data["net"]["host"].
If the visit comes from a real GoogleBot, the IP address should resolve to a domain in the google.com zone, for example:
crawl-66-249-66-1.googlebot.com
If:
- the hostname cannot be resolved;
- the hostname points to third-party infrastructure (for example,
ec2-3-145-12-52.us-west-2.compute.amazonaws.com); - the hostname belongs to another zone (
amazonaws.com,contabo.net, etc.);
this is a sign of a fake search bot pretending to be Google.
After adding this verification, our rule will look like this:
if (substr($data['net']['host'], -strlen(".google.com")) === ".google.com") {
// if the hostname ends with ".google.com", it is a real Google service bot
// allow this visit
  return false;
}

if (strpos($data['request']['user-agent'], 'bot') !== false) {
// if User-Agent contains "bot", classify the visit as a bot
  return true;
}

// if none of the conditions above are matched, classify the visit as a normal user
return false;
What Should Happen When a Rule Matches?
This is configured in the rule settings:
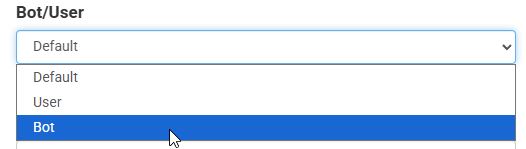
For our rule, if the rule returns TRUE, we classify this visit as a bot. The reason: if User-Agent contains "Bot" and the IP address does not resolve to Google's servers, this is most likely a fake bot.
Now choose the action for visits matched by this rule. In our example, we select: "Block".
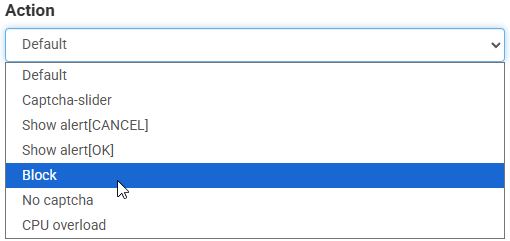
After select websites to apply this rule:
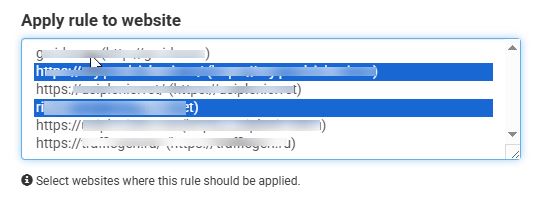
Done. After this, all visits processed by this KillBot script will be checked by this rule. If the rule matches (returns TRUE), the visitor parameters in analytics will contain the rule parameter with the rule number. The same rule number will also be displayed in the KillBot visit list.
Examples of How Bots Can Be Detected
Below are the main parameters that can help distinguish bots from real users. You can create universal rules and apply them to all websites in your KillBot account.
1. Host (IP Address Reverse DNS)
One of the strongest indicators is the host name where the visitor IP address resolves.
-
If an IP resolves to domains like:
*.amazonaws.com,digitalocean.comor other cloud platforms, it is usually a server, not a real home user. -
Such hosts are often used for bot operations or as VPN exit nodes.
-
If many visits come from the same range, it is almost certainly a bot network. A single visit may also be a VPN user.
if (strpos($data['net']['host'], 'amazon') !== false) {
// hostname contains the word 'amazon'
  return true; // IP belongs to Amazon infrastructure
}

return false; // allow other visitors
2. Timezone vs Geographic Location
Another useful check is the match between the user's timezone and the IP location.
-
For example, a user from Russia with timezone UTC+0 looks suspicious.
-
This may indicate a server environment, default system settings, or a bot that does not correctly emulate user settings.
if ($data['user']['timezone'] == 'UTC' && $data['net']['country'] === 'RU')
{
     return true; // timezone does not match Russia
}

return false;
3. Browser Language and Locale
Another useful indicator is the browser language (navigator.language) and locale settings.
-
For example, if timezone is Russian, browser language is Russian (
ru-RU), but locale is English, this is not a 100% bot indicator. However, if many visitors have the same pattern, it can indicate automated traffic. -
Combined with other signals, this increases confidence that the traffic is not from real users.
if (
$data['user']['timezone'] === 'Europe/Moscow'
&&
$data['browser']['language'] === 'ru-RU'
&&
$data['user']['locale'] === 'en-US'
)
{
      return true; // suspicious language and locale mismatch
}

return false;
4. Open Ports on the IP Address
A normal user — whether using mobile internet or home Wi-Fi — usually does not have open ports on their public IP address. This means that external services cannot connect directly to the user's computer, and no public web service is running on this IP.
If the IP address has open:
-
80 or 443 ports — there is a high probability that a web server is running on this IP.
-
22 (SSH) or 3389 (RDP) ports — these are remote administration services, commonly used on servers.
Such an IP address may belong to a VPN, proxy server, or a server used by bots.
if (isset($data['net']['ports'][443])) {

// if port 443 exists in the $data['net']['ports'] array

     return true; // suspicious port detected - possible server or VPN

}

return false;
5. TTL (Time To Live) Analysis
TTL (Time To Live) is a value stored in every network packet. It defines the maximum number of network hops (routers, servers, or other network devices) that the packet can pass through.
Each operating system uses its own default TTL value when sending packets.
| Operating System | TTL |
|---|---|
| Windows | 128 |
| Linux / Android / macOS | 64 |
| Unix BSD | 255 |
When a packet passes through a router, TTL decreases by 1. Therefore, based on the received TTL value, it is possible to approximately determine the original operating system.
For example, if the request headers say that the user is on Windows, but the TTL value is around 64 (typical for Linux), this is suspicious. Such a mismatch between User-Agent and TTL may indicate:
-
use of a proxy server that changes network characteristics;
-
a container or cloud server environment with another operating system;
-
fake User-Agent where a bot pretends to be another operating system.
TTL is not an absolute indicator. It can change because of network routing, VPN usage, and other conditions. However, together with other signals (WebDriver, host, locale, WebRTC, etc.), TTL becomes a powerful indicator of suspicious traffic and bot networks.
if ($data['device']['os'] === 'Windows' && $data['net']['ttl'] < 100) {

// OS=Windows but TTL is lower than expected for Windows

// suspicious mismatch

  return true;

}

return false;
7. 100% Bot Indicator: WebDriver = true
WebDriver is a browser automation interface that allows external software to control a browser and simulate user actions: clicks, typing, navigation, and other actions.
It is used by automation tools such as:
-
Selenium
-
Puppeteer
-
Headless Chrome / Firefox
If KillBot detects this parameter, it means:
-
the browser is controlled by software;
-
the browser contains:
navigator.webdriver = true; -
this is direct evidence that a bot script or automation platform controls the browser.
If webdriver=true, the visit is considered a bot. A real user can only have this value if someone is intentionally testing browser automation software.
if ($data['browser']['webdriver'] == true ) {

// definitely a bot

  return true;

}

return false;
9. Bot Indicator: wl=false (Browser Snapshot Not Found)
wl is a KillBot parameter. It can have two values:
-
true — the browser snapshot of this visit exists in the system browser list (trusted browsers);
-
false — the browser snapshot was not found among known trusted browsers.
If wl=false, KillBot classifies such visits as bots by default. If many visits have this parameter, they are almost certainly bots. If less than 5% of real traffic has this parameter, some of these visits may still belong to real users.
if ($data['killbot']['wl'] = true) {

// browser snapshot is not in the system browser list

          return true;

}

return false;
10. Block Specific ASNs
Some internet providers are mainly used for bot traffic. For example, Biterika and similar networks. It can be useful to block such ASN numbers immediately.
if (in_array($data['net']['asn'],array("35048","35049","54048") ) ){

// if ASN matches one of the listed values, classify as BOT

          return true;

}

return false;
11. Block Direct Traffic from a Specific Browser Snapshot
Sometimes you do not need to block all traffic from a browser snapshot. You may only want to restrict direct visits.
if ($data['killbot']['snsht'] == 3933974590 && $data['request']['referer'] == "") {

// if browser snapshot equals 3933974590
// and the visit has no referrer (direct traffic)

          return true;

}

return false;
12. Allow Traffic with a Specific URL Parameter
Sometimes you need to allow visitors with specific URL parameters or marketing tags.
if (stripos($data['request']['url'], 'from=seo') !==false ){

// if URL contains 'from=seo', apply the rule action

          return true;

}

return false;
13. Block Access from a Specific IP Address
if (in_array($data['net']['ip'],array("46.159.126.145") ) ){

// if IP matches the specified value, classify as BOT

          return true;

}

return false;
14. Allow Requests from a Specific Referer (Example: yandex.ru)
return isset($data['request']['referer'])
&& stripos($data['request']['referer'], 'yandex.ru') !== false;

// if referer contains yandex.ru,
// the configured rule action will be applied
// (for example, do not show captcha)
15. Show Captcha for Direct Visits Without Referer
if ($data['request']['referer'] == "") {

// if there is no referer, the rule is triggered
// for example, show captcha for such visitors

          return true;

}

return false;
16. Show Captcha for Visitors Outside CIS Countries
if (!in_array($data['net']['country'], ['RU', 'KZ', 'BY', 'AM', 'AZ', 'KG', 'MD', 'TJ', 'UZ', 'TM', 'GE']))
  {

      return true; // captcha for visitors outside this country list

  }

  return false;
17. Show Captcha for Visitors from China (CN)
if ($data['net']['country'] == 'CN')
  {

      return true; // visitors from China get captcha

  }

  return false;
18. Visitor from .google.com
if (strpos($data['net']['host'], '.google.com') !== false)
{

   return true; // visitor belongs to google.com
                // apply selected action, for example: no captcha

}

return false;
19. Visitor from .googlebot.com
if (strpos($data['net']['host'], '.googlebot.com') !== false)
{

   return true; // visitor belongs to googlebot.com
                // apply selected action, for example: no captcha

}

return false;
20. Visitor from .yandex.com
if (strpos($data['net']['host'], '.yandex.com') !== false)
{

   return true; // visitor belongs to yandex.com
                // apply selected action, for example: no captcha

}

return false;
21. Visitor from .yandex.ru
if (strpos($data['net']['host'], '.yandex.ru') !== false)
{

   return true; // visitor belongs to yandex.ru
                // apply selected action, for example: no captcha

}

return false;
22. Visitor with yandexwebcache.net Referer
return isset($data['request']['referer'])
&& stripos($data['request']['referer'], 'yandexwebcache.net') !== false;
23. Visitor from Google ASN 15169
if (in_array($data['net']['asn'],array("15169") ) ){

// ASN 15169 belongs to Google

// apply selected action, for example: no captcha

          return true;

}

return false;
24. Visitor from .gstatic.com
if (strpos($data['net']['host'], '.gstatic.com') !== false)
{

   return true; // visitor belongs to gstatic.com
                // apply selected action

}

return false;
Troubleshooting Website Access Issues
To diagnose why a website with KillBot does not open, check when the problem happens:
If the website stops working after some time, for example: first the website works through KillBot (the blue rotating circle appears, then the website opens successfully), but later it becomes unavailable - the problem is usually on the website server side or inside the website CMS. All requests through KillBot come from same KillBot server IP addresses. Some security modules or hosting protection systems may block the KillBot IP because they see many requests coming from one address.
If you enable KillBot and the website shows an error immediately after the KillBot Verification page, then the problem is usually related to proxy connection settings. In this case, try switching KillBot proxy connection to HTTP and remove the HTTP → HTTPS redirect on your website, so KillBot can connect to your website through port 80. Your website will still be available for visitors through HTTPS. The connection works like this: the visitor connects to KillBot using HTTPS, and KillBot connects to your website using HTTP internally.
Before explaining why a website behind KillBot may not open, please note: if you see the blue rotating circle, it means the KillBot Verification is already working.
The KillBot Verification page shows two numbers. The first number is the time spent running the KillBot algorithm - the time when KillBot checks the visitor and determines whether it is a bot. When the second number starts counting, KillBot has already finished its work and is waiting for the website content from your server.
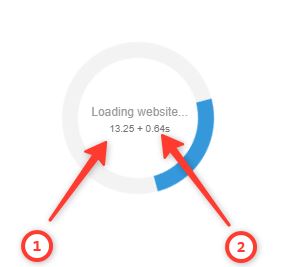
If KillBot finishes checking and the blue circle disappears, but your website still does not open, the most common problems are:
-
When KillBot is enabled, all requests to your website come from KillBot server IP addresses. Some hosting providers may block traffic when a large number of requests come from one IP address. In this case, contact your hosting provider and send this message:
Hello!
My website is protected by the KillBot.ru behavioral bot protection service. Because of this, all requests to my website come from KillBot service IP addresses. The current KillBot IP addresses can be found here: https://my.kill-bot.net/api/ips/killbot.json Please add these IP addresses to the allowlist so that traffic from them is not blocked. -
Problem with the website itself (KillBot is working correctly).
For KillBot to proxy your website, the website must open correctly through HTTPS (port 443) without KillBot. To check whether your website works correctly without KillBot, add your real website IP address to the hosts file:
C:\Windows\System32\drivers\etc\hostsExample:
127.0.0.1 domain.com
Replace 127.0.0.1 with your real website IP address, and replace domain.com with your website domain.
Many website access problems are caused by:
- incorrect .htaccess rules (for example, endless redirects),
- SSL certificate problems.
KillBot connects to your website through port 443, so your website must support HTTPS and have an SSL certificate installed. A self-signed certificate is also acceptable.
-
Wrong website server IP address in KillBot settings.
This is one of the most common problems. If after the KillBot Verification page you see a hosting provider error page, in most cases the website server IP address in KillBot settings is incorrect. Please check the IP address digit by digit.
-
Your CMS security modules may block the website.
Your website may have security modules installed, for example: Defender, Security, and similar plugins. These CMS-level protection modules may detect many visits from one IP address and consider them suspicious. As a result, they may block requests or slow down website access. In this case, open your CMS settings and disable these protection modules or add KillBot IP addresses to their allowlist.
-
ERR_TOO_MANY_REDIRECTS - too many redirects.
Possible reasons:
- incorrect website IP address in KillBot settings;
- incorrect DNS A record;
- incorrect server configuration;
- redirect rules in the .htaccess file.
First, check the IP address carefully digit by digit. If the IP address is correct, check the .htaccess file and remove incorrect redirect rules.
If you want to deploy KillBot on your own server, you will need:
-
Your own VPS. We recommend at least 2 CPU cores, 2 GB RAM, and 10 GB disk space. If your website has high traffic, use a larger disk so log files do not fill up the storage.
-
Operating System: Ubuntu 22.04
-
Choose one of the installation methods:
-
Automatic installation from our website.
Simply enter your server SSH username and password, and KillBot will be installed automatically: https://my.kill-bot.net/vps/install-killbot/manual -
Manual installation.
Download the installation shell script and run it on your server. The installation instructions are below. Installation script: https://data.kill-bot.net/killbot_dns/kb_install.sh
-
For manual installation, run the following commands in the Ubuntu terminal:
sudo apt update
apt-get install wget
wget https://data.kill-bot.net/killbot_dns/kb_install.sh -O kb_install.sh
chmod +x kb_install.sh

yes '' | sudo DEBIAN_FRONTEND=noninteractive NEEDRESTART_MODE=a ./kb_install.sh
That's all. The installer will automatically download all required KillBot files and create the necessary Apache2 configuration files.
To update KillBot later, simply run:
sudo /opt/killbot/UpdateAll.sh
Configure KillBot from your account
After installing KillBot on your server, no additional server configuration is normally required. You can simply leave the server running and manage everything from your KillBot account. Just enter the IP address of your KillBot server in the project settings, and your websites will automatically connect to it.
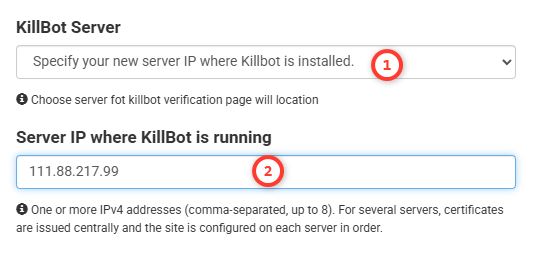
KillBot server file structure
The kb_install.sh installation script configures Nginx + Apache2 to work as a reverse proxy. It also automatically installs Let's Encrypt SSL certificates to provide secure HTTPS connections. Your website's DNS A record should point to your KillBot server. KillBot will forward requests to your website server only after the verification page has been successfully completed.
KillBot stores its files in:
/opt/killbot
When a website is connected, KillBot automatically creates the required Nginx and Apache configuration files to proxy traffic to your website.
-
/etc/apache2/sites-available/domain-killbot.conf
Apache configuration with the KillBot Verification page enabled. All website traffic passes through KillBot and is analyzed before reaching your website. -
/etc/apache2/sites-available/domain.conf
Reverse proxy configuration without KillBot protection. Traffic still passes through the KillBot server, but visitors are not checked. This configuration is used when you temporarily disable the KillBot Verification page.
Main files:
-
Verification page:
/opt/killbot/html/verification.phpYou may modify this file if necessary, but be careful not to break its functionality. -
Layer 7 DDoS protection:
/opt/killbot/f2b/subnet-monitor.shThis script monitors the Nginx access log and automatically blocks IP ranges that send more than 1500 requests per minute. It provides effective protection against HTTP flood attacks, even when attackers use valid HTTP requests.
Configuration file:
/opt/killbot/f2b/subnet-monitor.confWhitelist of IP addresses that should never be blocked:
/opt/killbot/f2b/subnet-monitor-whitelist.conf -
Block all countries except allowed ones:
/opt/killbot/f2b/block_all_countries_exept.shConfiguration file:
/opt/killbot/f2b/block_all_countries_exept.config
Using your own SSL certificate
If you want to use your own SSL certificate instead of Let's Encrypt:
- In your KillBot settings, set "Issue Let's Encrypt Certificate" to "No".
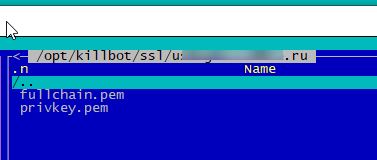
- Upload your SSL certificate files to:
/opt/killbot/ssl/domain.com/
Replace domain.com with your own domain name. Create this directory if it does not already exist. -
Place the following two certificate files into this directory:
Certificate private key:
/opt/killbot/ssl/domain.com/privkey.pemCertificate chain:
/opt/killbot/ssl/domain.com/fullchain.pemThe filenames must be exactly as shown above.
-
After uploading your SSL certificate files, click "Reload DNS" in your project settings on KillBot.ru. This reloads the web server configuration and applies the new certificate.
Managing KillBot Verification Page
The commands below allow you to enable or disable the KillBot Verification page directly on your server for each connected domain.
Replace domain.com with your own domain name.
-
Enable KillBot Verification page:
sudo kb ensite domain.com -
Disable KillBot Verification page (traffic will still pass through the KillBot server, but visitors will not be checked):
sudo kb dissite domain.com -
Reload Apache with the KillBot configuration:
sudo kb reload
Need more customization?
KillBot is fully open for advanced configuration. You can modify the verification page, adjust DDoS protection rules, customize Apache and Nginx settings, or integrate KillBot into your own infrastructure.
However, unless you have special requirements, we recommend using the default configuration, which is optimized for most websites.